> ## Documentation Index
> Fetch the complete documentation index at: https://developers.techwolf.ai/llms.txt
> Use this file to discover all available pages before exploring further.
# Installation
export const vendor_0 = "Workday"
export const scopes_0 = "'Jobs & Positions', 'Worker Profile and Skills'"
## System Requirements
The TechWolf Skills integration will make use of existing Workday functionality.
The customer will need a TechWolf contract with a live TechWolf tenant.
This TechWolf tenant must be populated with (a subset of) the Job's entities in
Workday.
Additionally, Workday's Synonym Management must be enabled in the Workday
tenant, with the correct configuration. For Skills Cloud Skills, the sync only
supports canonical Skills, not their synonyms; Synonym Management resolves
synonyms to their canonical Skill so profiles remain fully syncable. See
[Automated Skill Management (Synonym Management)](/integrations/reference/workday-skills#automated-skill-management-synonym-management)
for the required configuration, also as it relates to the optional
synchronization of custom skills managed in TechWolf to Workday as Maintained
Skills.
## Workday Configuration
A Workday integration user must be configured in the Workday tenant with an
implementation security group.
If you already have an Employee Skill Sync integration configured, you can
either set up a new, separate configuration or reuse parts of the existing
one. When reusing the existing setup, the same ISU can be kept, with only
the Permissions needing to be updated in step 4. Additionally, when using
OAuth, the API Client scopes also need to be updated in step 6.
## Authentication
The integration supports both OAuth and Basic Authentication. For enhanced
security, we recommend using OAuth authentication. Basic Authentication can be
used on request.
If you already have Basic Authentication configured, or prefer to continue using
it, we will continue to support this method as well.
To set up the integration using **OAuth Authentication**, complete steps 1
through 7.
To set up the integration using **Basic Authentication**, complete steps 1
through 5.
**What you'll share with TechWolf:**
If you choose OAuth Authentication:
* Workday API URL
* Token URL
* Client ID
* Client secret
* Refresh token
If you choose Basic Authentication:
* Workday API URL
* Username
* Password
### 1. Create Integration System User (ISU)
* `Create Integration System User` business process.
* Do not allow UI sessions as this user will only be used for automations.
* Please securely store the username and password of this user.
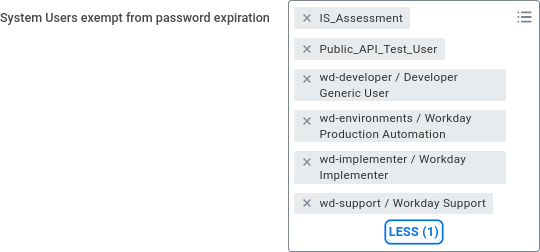
### 2. Update password expiration rules for ISU
* In the `Maintain Password Rules` business process under "System Users exempt
from password expiration" add the newly created ISU to the list.
* **Note:** This ensures the integrations will keep running without
interruptions due to password expiration.
 ### 3. Set up security permissions for the ISU through security policies
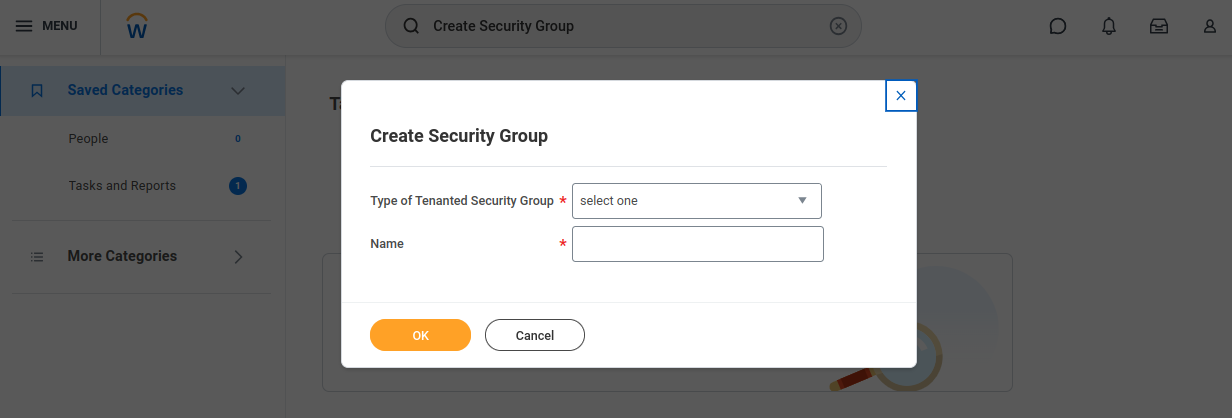
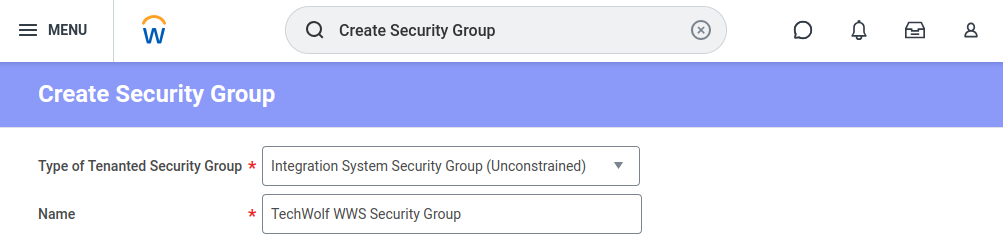
* Go to `Create Security Group`, choose "Integration System Security Group
(Unconstrained)".
* **Note on acceptance testing:** Consider using two different security groups,
one Unconstrained and one Constrained. This way, the test-set is scoped while
the correct permissions are applied for other Web Services.
### 3. Set up security permissions for the ISU through security policies
* Go to `Create Security Group`, choose "Integration System Security Group
(Unconstrained)".
* **Note on acceptance testing:** Consider using two different security groups,
one Unconstrained and one Constrained. This way, the test-set is scoped while
the correct permissions are applied for other Web Services.
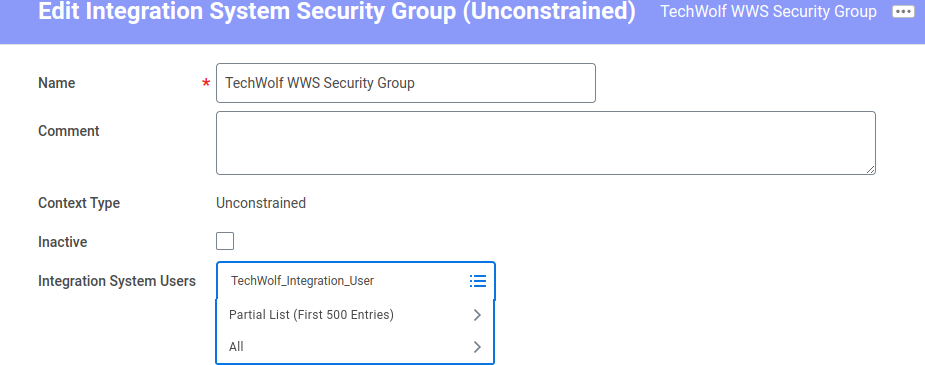
 * The next screen presents you with an Edit form to add additional information.
Add your ISU to the list. This can be changed later too. Do not check
"Inactive".
* The next screen presents you with an Edit form to add additional information.
Add your ISU to the list. This can be changed later too. Do not check
"Inactive".
 ### 4. Edit the Security Group's domain security policies
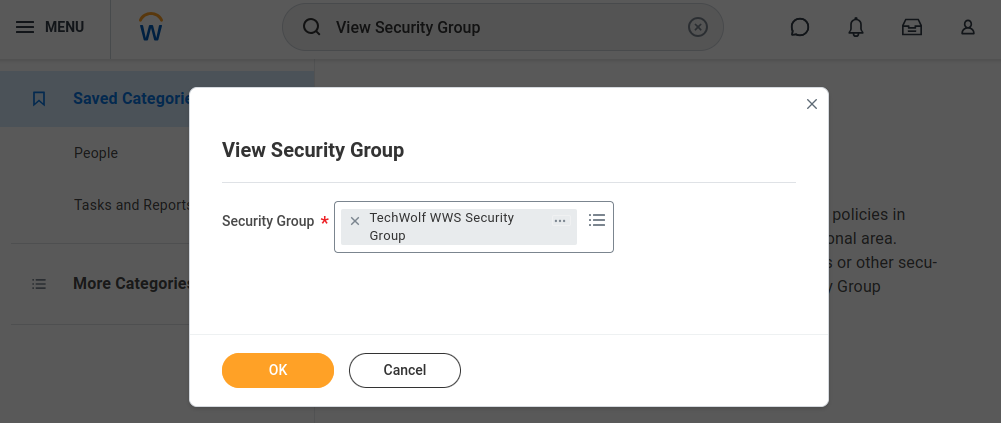
* Search for "View Security Group" and select your created security group.
### 4. Edit the Security Group's domain security policies
* Search for "View Security Group" and select your created security group.
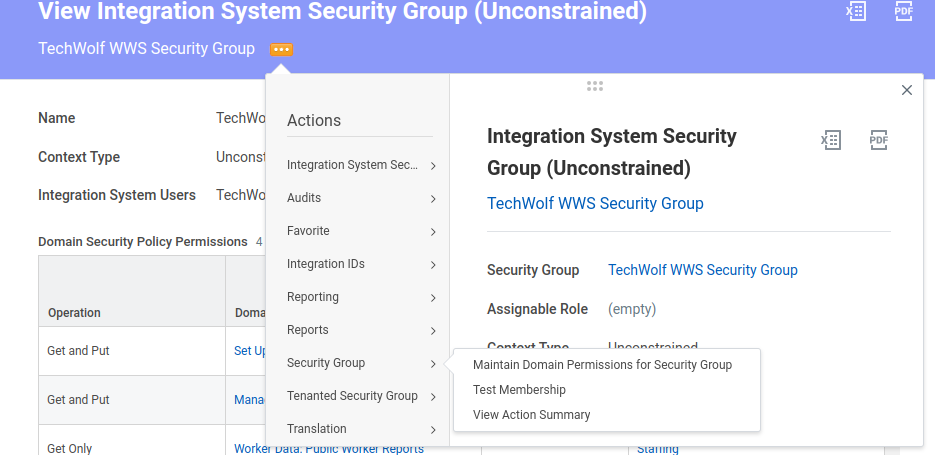
 * Select the option menu next to the Security Group's name, go to "Security
Group" and select "Maintain Domain Permissions for Security Group".
* Select the option menu next to the Security Group's name, go to "Security
Group" and select "Maintain Domain Permissions for Security Group".
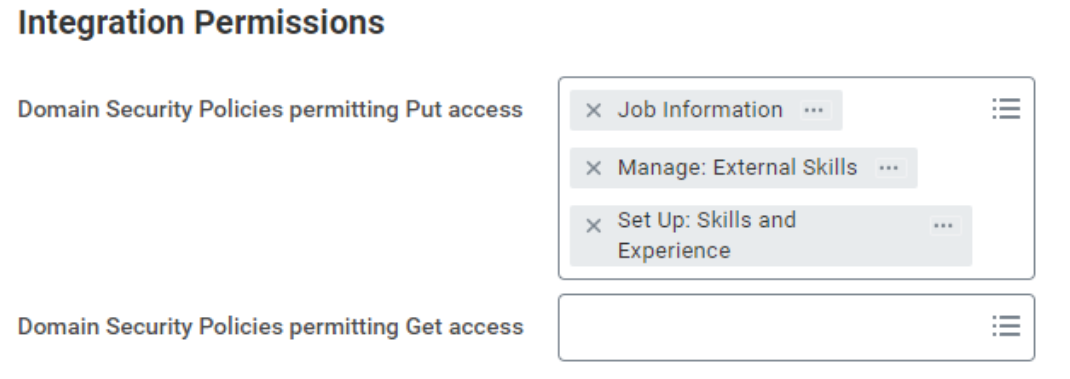
 * Under Integration Permissions add the following Domain Security Policies, and
run the `Activate Pending Security Policy Changes` task to apply the changes.
| Domain Security Policy | Access |
| - | :-: |
| Job Information | Put |
| Manage: External Skills | Put |
| Set up: Skills and Experience | Put |
* Under Integration Permissions add the following Domain Security Policies, and
run the `Activate Pending Security Policy Changes` task to apply the changes.
| Domain Security Policy | Access |
| - | :-: |
| Job Information | Put |
| Manage: External Skills | Put |
| Set up: Skills and Experience | Put |
 ### 5. Find out the correct Workday API URL
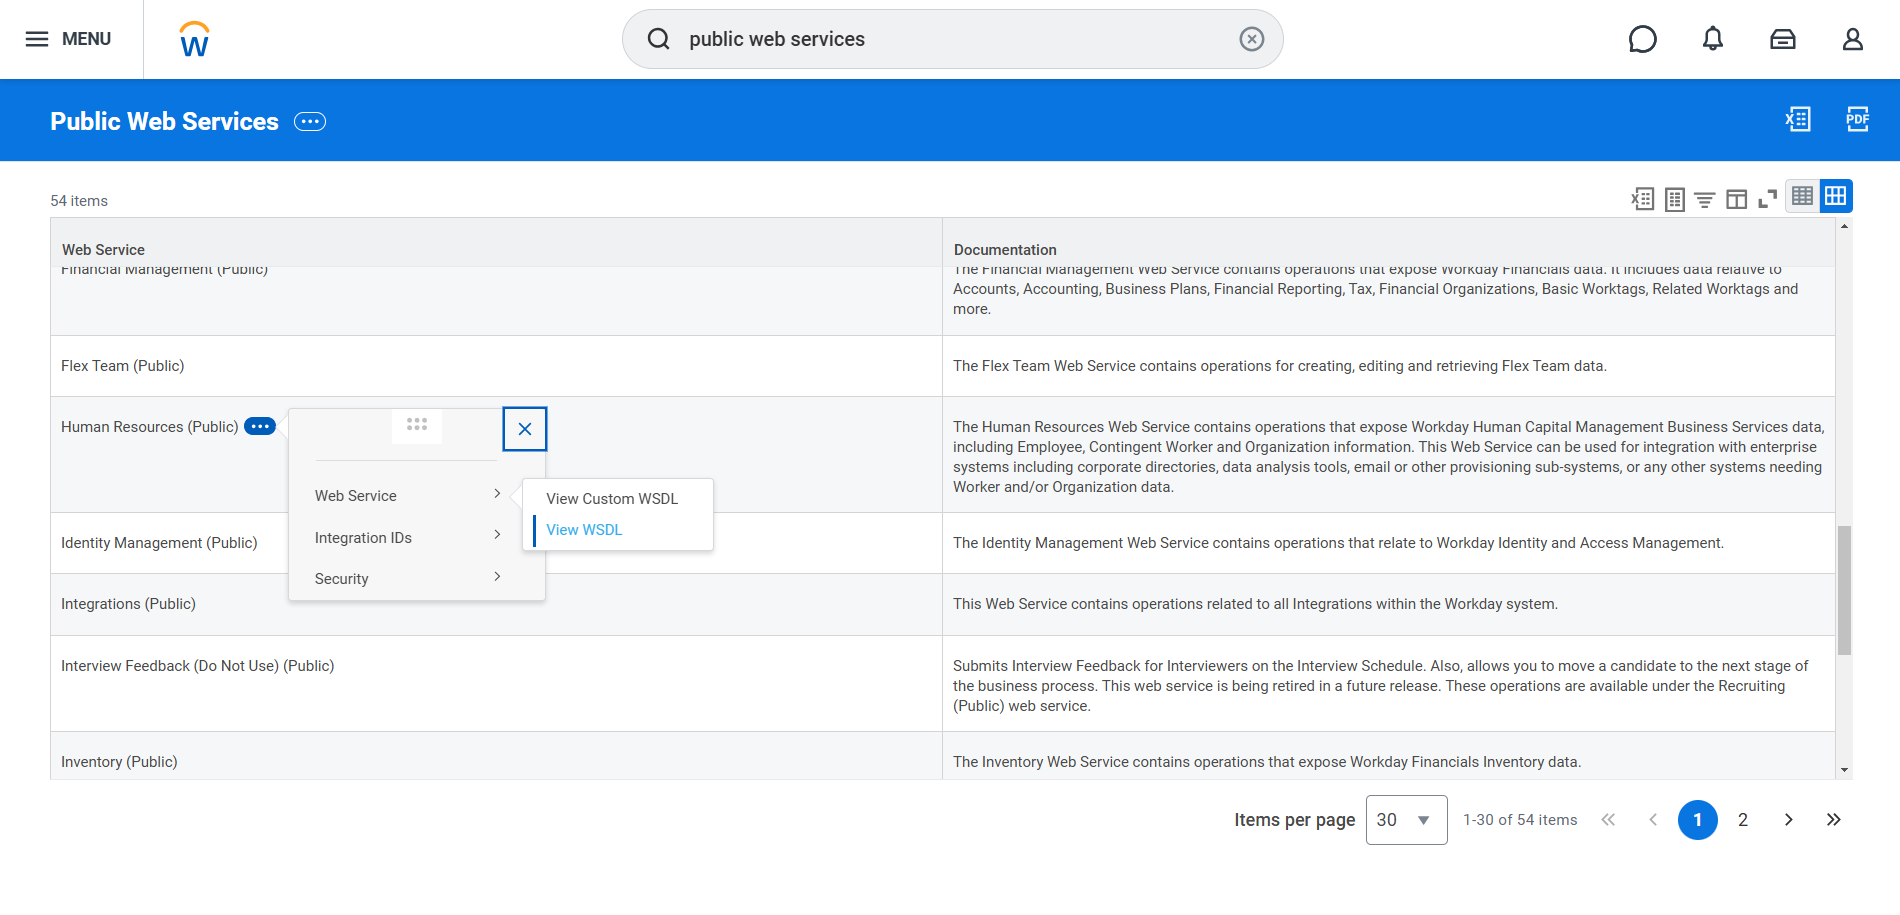
* Search for `Public Web Services` in the search bar at the top of the Workday
home page.
* In the list, click the three dots next to the `Human Resources (public)`
entry. Select `View WSDL` under `Web Service`.
### 5. Find out the correct Workday API URL
* Search for `Public Web Services` in the search bar at the top of the Workday
home page.
* In the list, click the three dots next to the `Human Resources (public)`
entry. Select `View WSDL` under `Web Service`.
 * The resulting page will take some time to load. Once it is loaded, look for
"soapbind:address location" near the bottom of the page. You will see a
section like this:
```xml theme={null}
```
* Copy the base tenant URL up to and including your tenant name. The service
name and version should be excluded from the URL.
* Note that the API URL can differ between implementation tenants and production
tenants, so the steps described above need to be repeated for each tenant
individually.
If you are using **OAuth Authentication** (recommended), continue with the
OAuth setup steps below before connecting the integration.
If you have arranged **Basic Authentication**, this is the final Workday
configuration step. Proceed to the
[TechWolf Configuration](#techwolf-configuration) section.
### 6. Create API Client for Integrations
* Search for "Register API Client for Integrations" business process
* Enable non-expiring refresh tokens to ensure continuity of service
* Add the appropriate scopes: {scopes_0}
* The resulting page will take some time to load. Once it is loaded, look for
"soapbind:address location" near the bottom of the page. You will see a
section like this:
```xml theme={null}
```
* Copy the base tenant URL up to and including your tenant name. The service
name and version should be excluded from the URL.
* Note that the API URL can differ between implementation tenants and production
tenants, so the steps described above need to be repeated for each tenant
individually.
If you are using **OAuth Authentication** (recommended), continue with the
OAuth setup steps below before connecting the integration.
If you have arranged **Basic Authentication**, this is the final Workday
configuration step. Proceed to the
[TechWolf Configuration](#techwolf-configuration) section.
### 6. Create API Client for Integrations
* Search for "Register API Client for Integrations" business process
* Enable non-expiring refresh tokens to ensure continuity of service
* Add the appropriate scopes: {scopes_0}
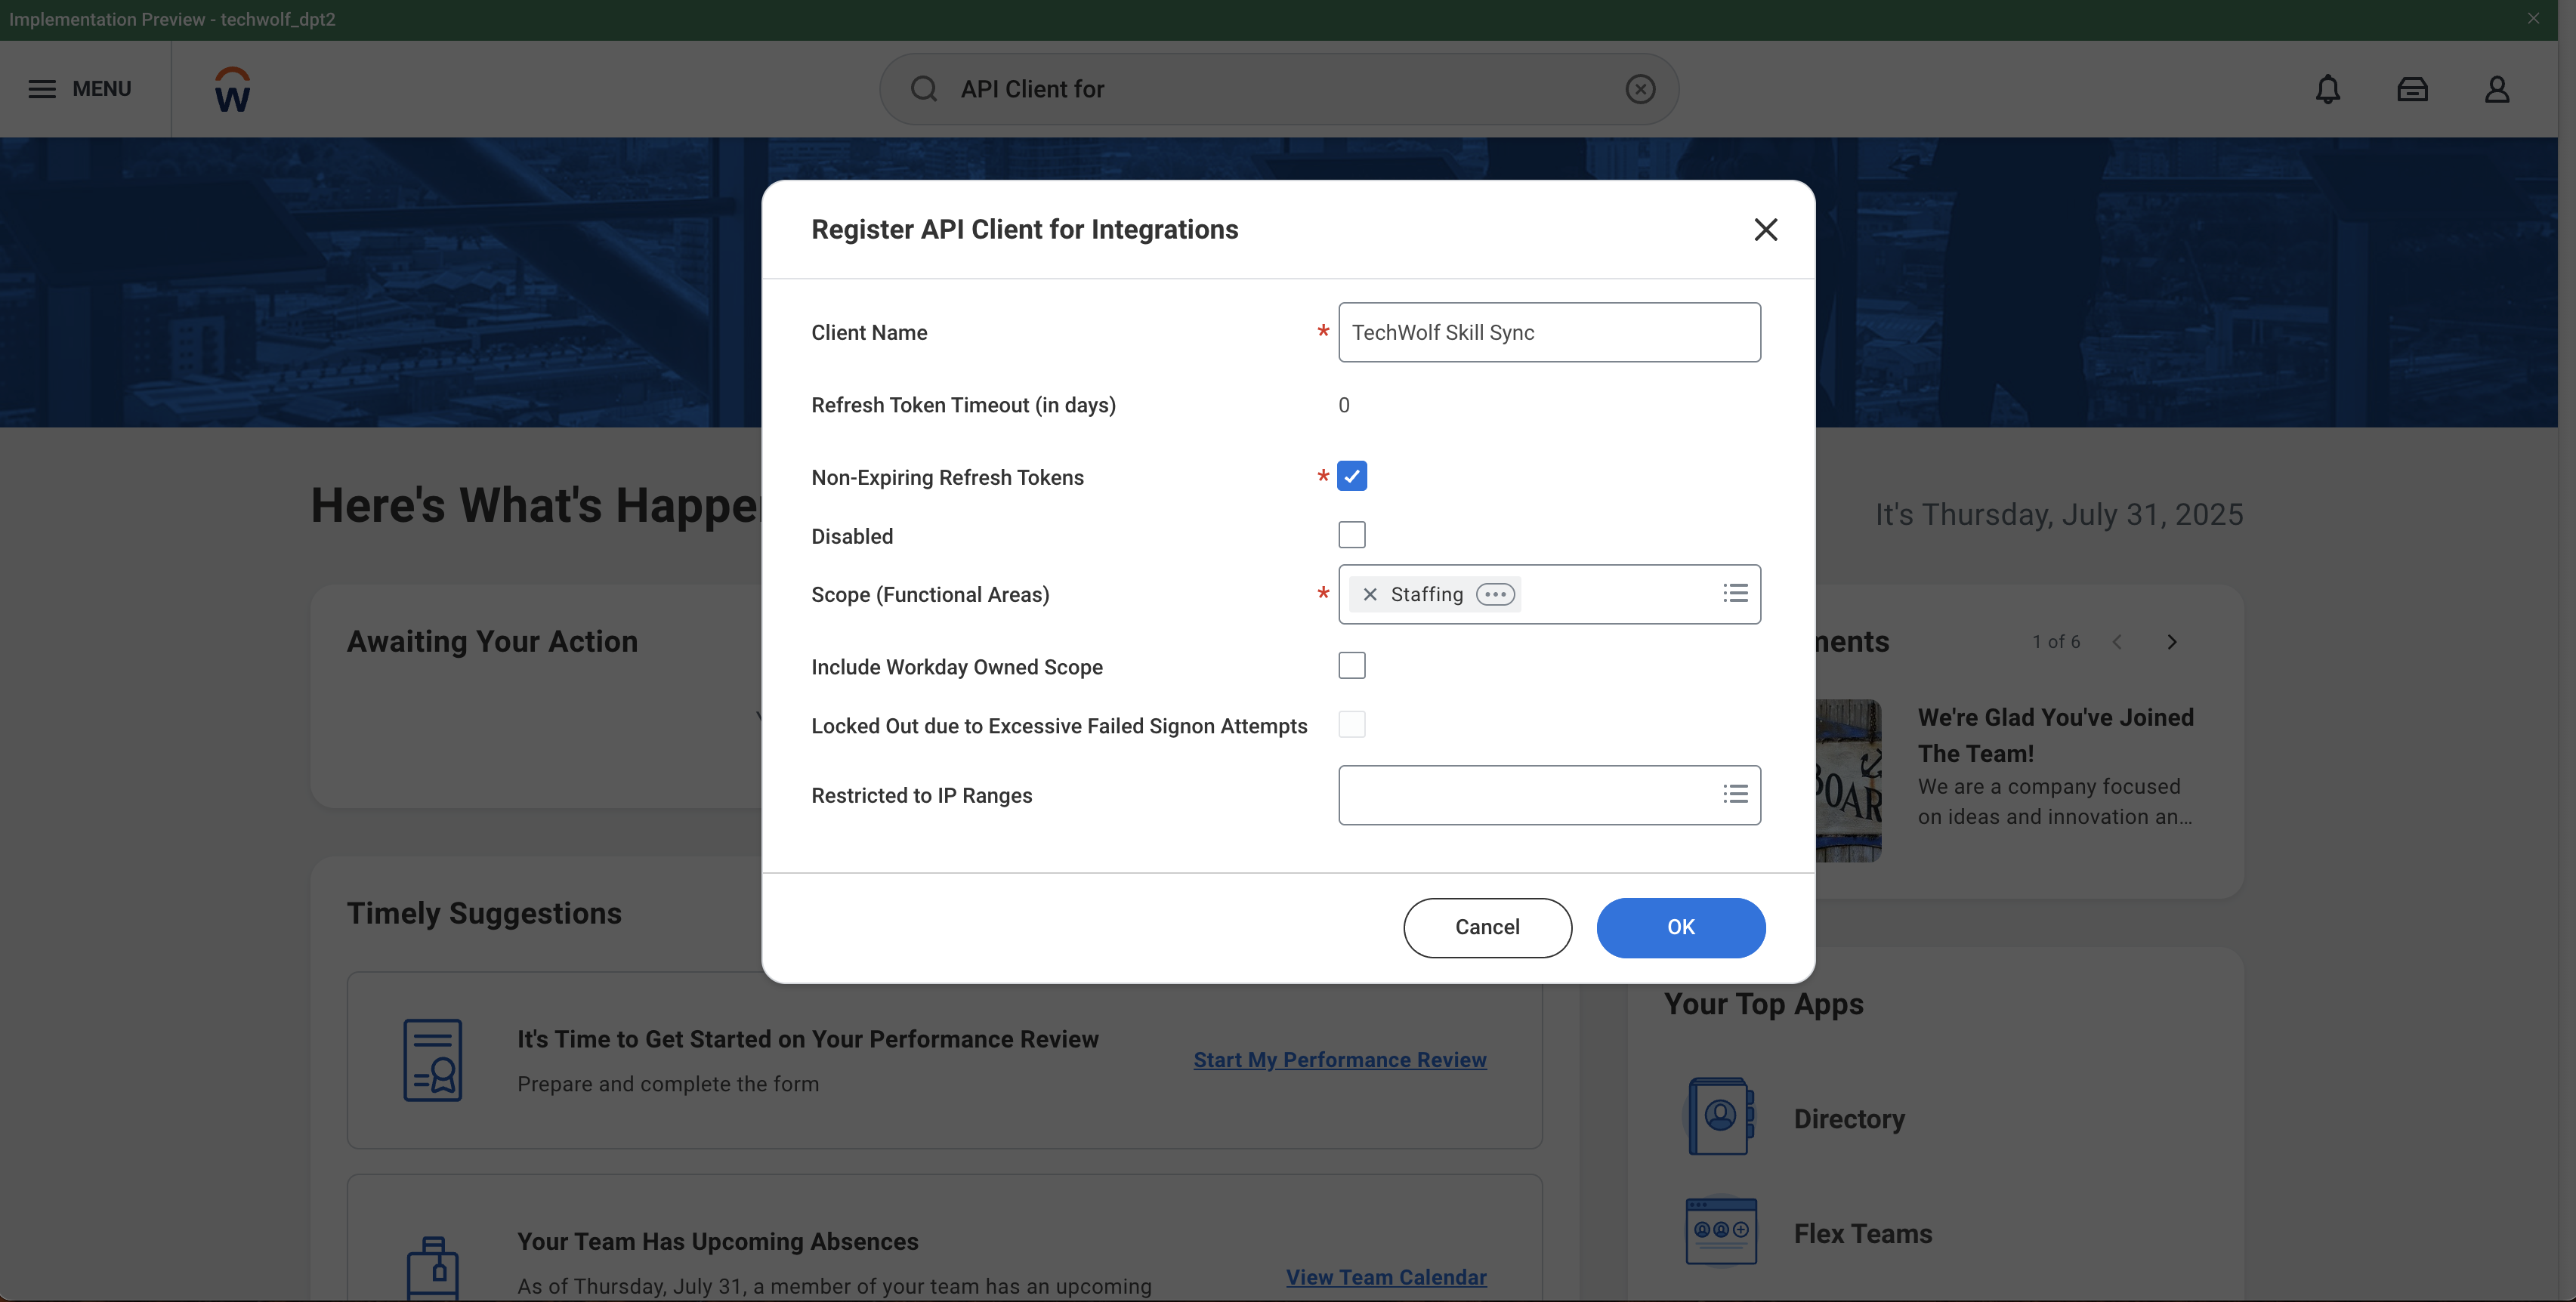 * Optionally, restrict the client to TechWolf's IP ranges by filling in the
"Restricted to IP Ranges" field with the values from the
[IP Addresses ](/integrations/reference/ip-addresses)
page
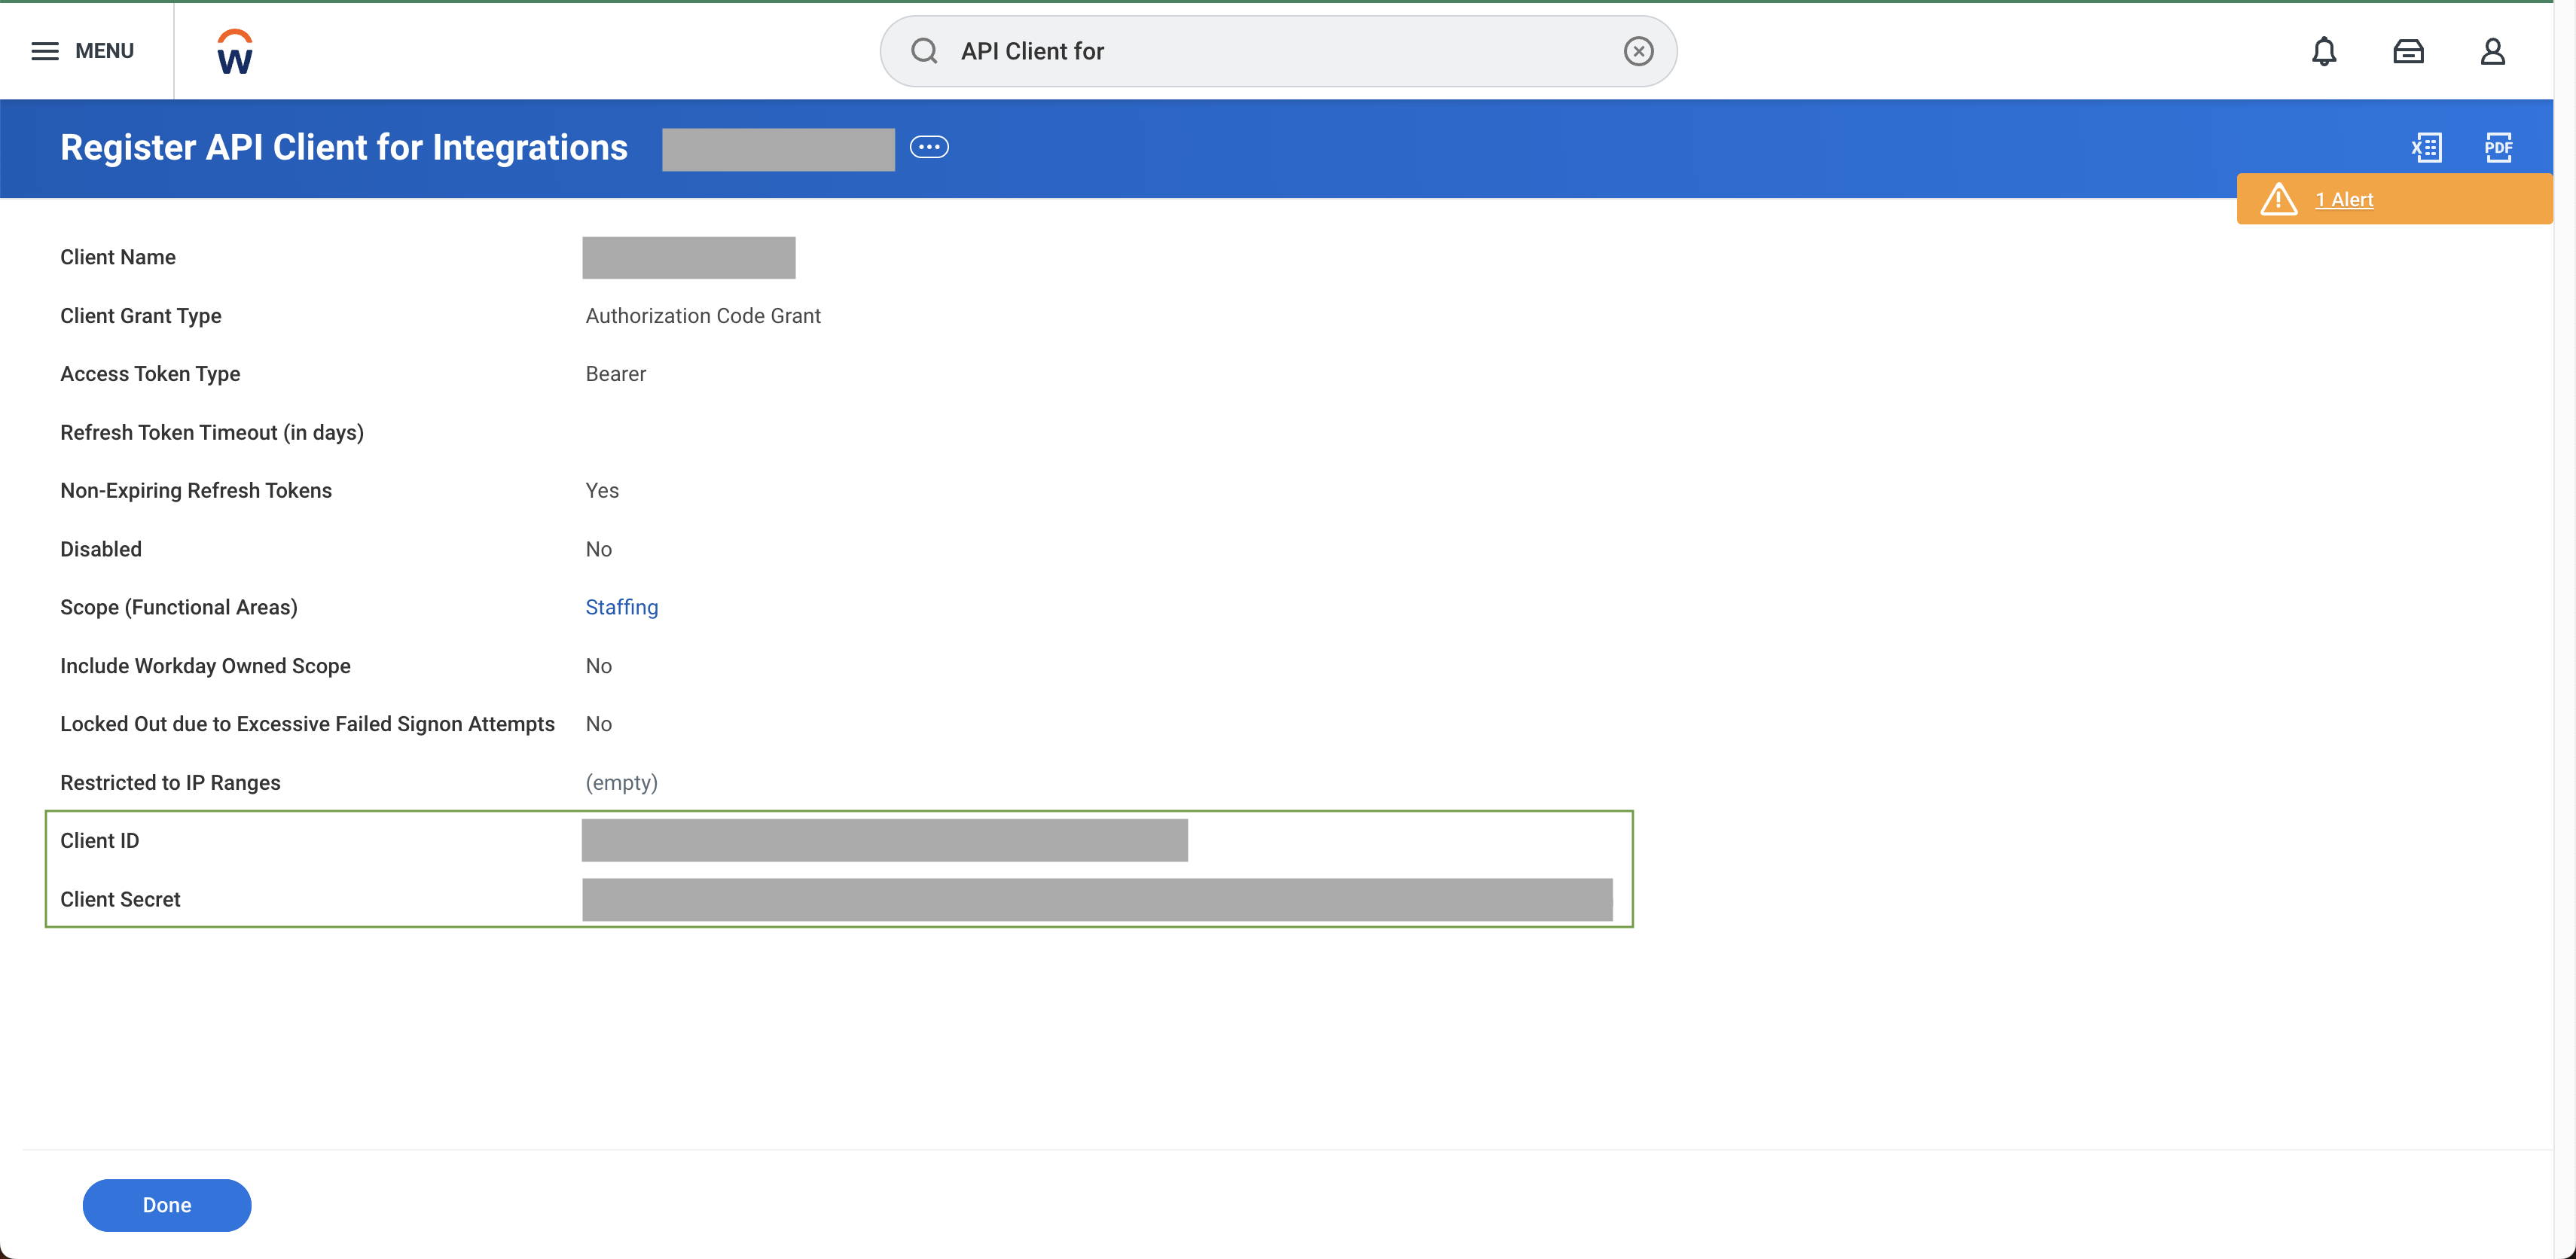
* Securely store the client ID and client secret
* Optionally, restrict the client to TechWolf's IP ranges by filling in the
"Restricted to IP Ranges" field with the values from the
[IP Addresses ](/integrations/reference/ip-addresses)
page
* Securely store the client ID and client secret
 ### 7. Generate Refresh Token
* Search for "View API Clients" report
* Click "API Clients for Integrations" tab
* Note down the token endpoint. You will need to share this later.
### 7. Generate Refresh Token
* Search for "View API Clients" report
* Click "API Clients for Integrations" tab
* Note down the token endpoint. You will need to share this later.
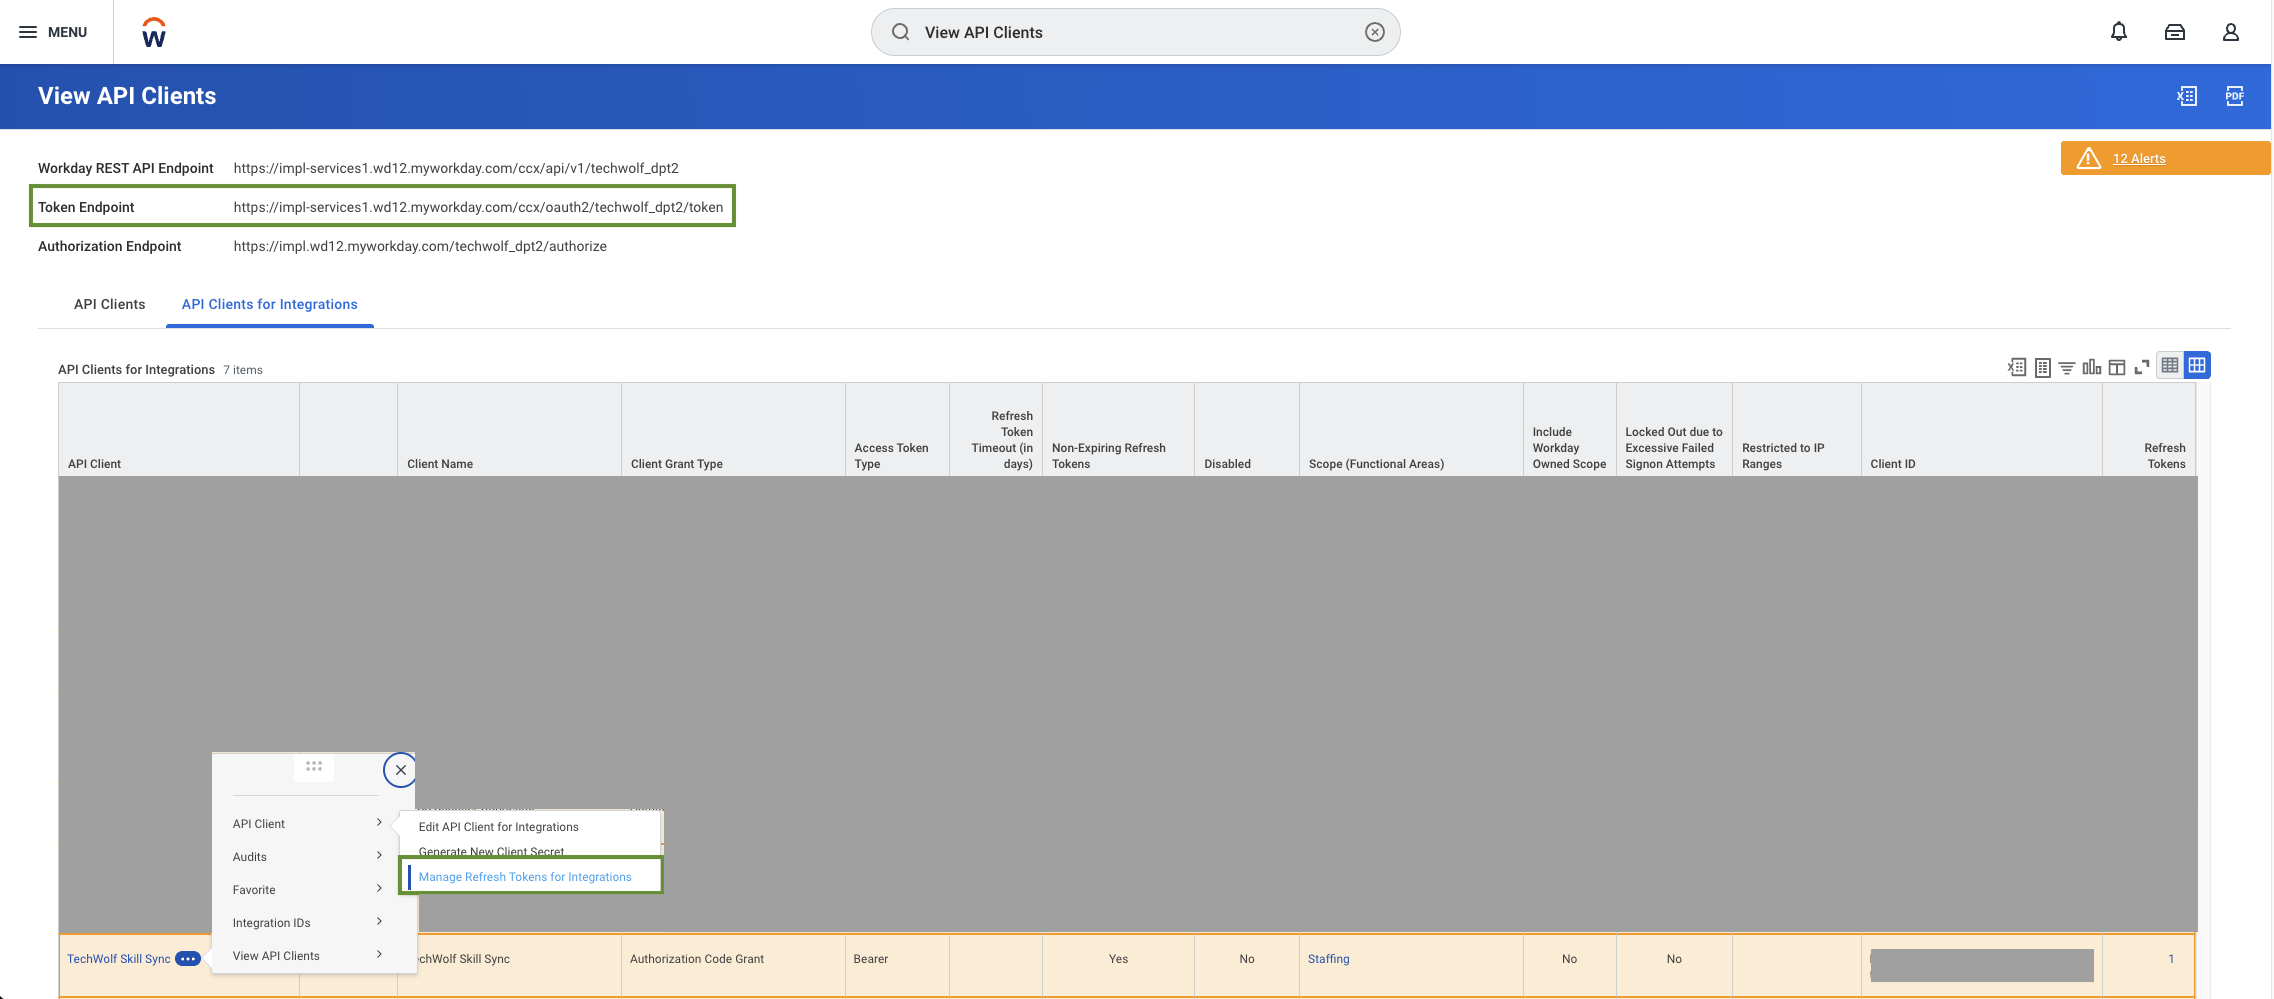 * Find your API client and select "Manage Refresh Tokens for Integrations"
* Under "Workday Account", type in your ISU
* Press OK
* Check the box "Generate new refresh token"
* Press OK
* Securely store the refresh token.
Keep your OAuth credentials secure and share them only with TechWolf through
secure channels.
When the authentication credentials and Workday API URL are shared, the setup is
complete on the customer's Workday tenant. TechWolf will validate that the ISU
has the required permissions and that the API URL is correct.
## TechWolf Configuration
The TechWolf tenant will be configured by TechWolf itself.
1. In the integration service on the TechWolf side, TechWolf adds the
credentials of the customer-created ISU. For this, the customer will need to
share the following values with TechWolf:
* The Workday API URL (see Step 5 of the Workday Configuration section)
* Authentication credentials:
* OAuth Authentication (recommended): client ID, client secret, and
refresh token (see Steps 6–7 of the Workday Configuration section)
* Basic Authentication (on request): ISU username and password (see
Steps 1–2 of the Workday Configuration section)
2. TechWolf adds TechWolf API credentials with correct scopes to have access to
the TechWolf API and links that TechWolf tenant to the Workday tenant.
3. TechWolf validates that the ISU has the required permissions and that the
Workday API URL is correct.
4. TechWolf runs an initial sync of Job profiles with the TechWolf API and sets
up the tenant configuration to start the bidirectional sync process.
## Routing Through an API Gateway
If your organisation fronts the {vendor_0} APIs with an API gateway, the
integration can call the gateway instead of the vendor host directly. Two
settings are available, both configured by TechWolf together with the
credentials:
* **Custom URL**: instead of the vendor API URL, share the gateway URL that
proxies it. The integration keeps appending the same vendor API paths to it,
so the gateway must forward requests to {vendor_0} unchanged.
* **Custom headers**: any number of extra HTTP headers (for example an API key
or a correlation ID required by the gateway) that are sent on every request
the integration makes.
Both settings are pass-through only. TechWolf sends the values as configured
and does not perform any gateway-specific authentication, signing, or token
refresh; the gateway is expected to forward the integration's own
credentials to {vendor_0}. Reserved headers (e.g. `Authorization`,
`Content-Type`) are managed by the integration and cannot be set as custom
headers.
## Linking Workday & TechWolf - Seamless Matching of Job IDs
A critical aspect of this process is the seamless coupling of Job IDs across
both platforms. There are two options for direct ID matching:
1. **Using Job Codes**: If you want to use Workday Job Codes (also known as Job
Profile IDs) as the identifier field in Workday, then this same ID must also
be used as the Job `external_id` in TechWolf.
2. **Using Workday IDs (WIDs)**: If you want to use Workday IDs as the
identifier field in Workday, then this same ID must also be used as the Job
`external_id` in TechWolf. This option is only available if you have a
generator configured in Workday for Job Codes. For details on how to set this
up, please refer to the Workday documentation, e.g.
[Create ID Definitions and Sequence Generators](https://doc.workday.com/admin-guide/en-us/manage-workday/tenant-configuration/tenant-setup/id-definitions-and-sequence-generators/dan1370796358261.html?lang=en-us).
## Deployment Methodology
The following tasks and responsibilities assume that:
1. The customer has the appropriate TechWolf API license(s).
2. The TechWolf API contains all Job information corresponding to Workday Jobs
and data from other external systems.
### Deployment Tasks & Responsibilities
1. **TechWolf**: Setup Skill Sync environment and tenant requirements
2. **Customer**: Verify the Synonym Management configuration (see
[System Requirements](#system-requirements)).
3. **Customer**: Create Integration System User (ISU) based on workflow
described above.
4. **Customer**: Share authentication credentials with TechWolf:
* OAuth Authentication (recommended): `client_id`, `client_secret`, and
refresh token
* Basic Authentication (on request): ISU `username` and `password`
5. **Customer**: Share Workday API URL with TechWolf.
6. **TechWolf**: Run initial sync of Job profiles with TechWolf API.
7. **TechWolf**: Setup tenant configuration and start bidirectional sync
process.
8. **Customer**: Check end-user test scenarios.
This documentation is built and hosted on [Mintlify](https://mintlify.com), a developer documentation platform.
* Find your API client and select "Manage Refresh Tokens for Integrations"
* Under "Workday Account", type in your ISU
* Press OK
* Check the box "Generate new refresh token"
* Press OK
* Securely store the refresh token.
Keep your OAuth credentials secure and share them only with TechWolf through
secure channels.
When the authentication credentials and Workday API URL are shared, the setup is
complete on the customer's Workday tenant. TechWolf will validate that the ISU
has the required permissions and that the API URL is correct.
## TechWolf Configuration
The TechWolf tenant will be configured by TechWolf itself.
1. In the integration service on the TechWolf side, TechWolf adds the
credentials of the customer-created ISU. For this, the customer will need to
share the following values with TechWolf:
* The Workday API URL (see Step 5 of the Workday Configuration section)
* Authentication credentials:
* OAuth Authentication (recommended): client ID, client secret, and
refresh token (see Steps 6–7 of the Workday Configuration section)
* Basic Authentication (on request): ISU username and password (see
Steps 1–2 of the Workday Configuration section)
2. TechWolf adds TechWolf API credentials with correct scopes to have access to
the TechWolf API and links that TechWolf tenant to the Workday tenant.
3. TechWolf validates that the ISU has the required permissions and that the
Workday API URL is correct.
4. TechWolf runs an initial sync of Job profiles with the TechWolf API and sets
up the tenant configuration to start the bidirectional sync process.
## Routing Through an API Gateway
If your organisation fronts the {vendor_0} APIs with an API gateway, the
integration can call the gateway instead of the vendor host directly. Two
settings are available, both configured by TechWolf together with the
credentials:
* **Custom URL**: instead of the vendor API URL, share the gateway URL that
proxies it. The integration keeps appending the same vendor API paths to it,
so the gateway must forward requests to {vendor_0} unchanged.
* **Custom headers**: any number of extra HTTP headers (for example an API key
or a correlation ID required by the gateway) that are sent on every request
the integration makes.
Both settings are pass-through only. TechWolf sends the values as configured
and does not perform any gateway-specific authentication, signing, or token
refresh; the gateway is expected to forward the integration's own
credentials to {vendor_0}. Reserved headers (e.g. `Authorization`,
`Content-Type`) are managed by the integration and cannot be set as custom
headers.
## Linking Workday & TechWolf - Seamless Matching of Job IDs
A critical aspect of this process is the seamless coupling of Job IDs across
both platforms. There are two options for direct ID matching:
1. **Using Job Codes**: If you want to use Workday Job Codes (also known as Job
Profile IDs) as the identifier field in Workday, then this same ID must also
be used as the Job `external_id` in TechWolf.
2. **Using Workday IDs (WIDs)**: If you want to use Workday IDs as the
identifier field in Workday, then this same ID must also be used as the Job
`external_id` in TechWolf. This option is only available if you have a
generator configured in Workday for Job Codes. For details on how to set this
up, please refer to the Workday documentation, e.g.
[Create ID Definitions and Sequence Generators](https://doc.workday.com/admin-guide/en-us/manage-workday/tenant-configuration/tenant-setup/id-definitions-and-sequence-generators/dan1370796358261.html?lang=en-us).
## Deployment Methodology
The following tasks and responsibilities assume that:
1. The customer has the appropriate TechWolf API license(s).
2. The TechWolf API contains all Job information corresponding to Workday Jobs
and data from other external systems.
### Deployment Tasks & Responsibilities
1. **TechWolf**: Setup Skill Sync environment and tenant requirements
2. **Customer**: Verify the Synonym Management configuration (see
[System Requirements](#system-requirements)).
3. **Customer**: Create Integration System User (ISU) based on workflow
described above.
4. **Customer**: Share authentication credentials with TechWolf:
* OAuth Authentication (recommended): `client_id`, `client_secret`, and
refresh token
* Basic Authentication (on request): ISU `username` and `password`
5. **Customer**: Share Workday API URL with TechWolf.
6. **TechWolf**: Run initial sync of Job profiles with TechWolf API.
7. **TechWolf**: Setup tenant configuration and start bidirectional sync
process.
8. **Customer**: Check end-user test scenarios.
This documentation is built and hosted on [Mintlify](https://mintlify.com), a developer documentation platform.